I saw some beautiful
3D
illustration of Madagascar that inspired me to create this
illustration. In this tutorial, I’ll share my experience in recreating
this illustration. This tutorial will utilize Photoshop 3D features,
layer masking, and a lot of selections.
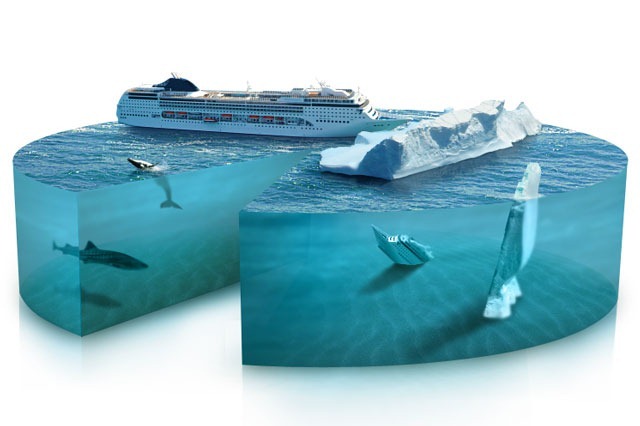
Preview of Final Results
 ResourcesStep 1
Create a new layer (Ctrl+N) with 1600x1200px wide and
resolution is set to 150dpi. Create a new layer, fill it with solid 50%
gray color.

Step 2Create a 3D shape by
accessing menu 3D > New Shape From Layer > Cylinder. Use one of
the 3D Object tool to reduce the cylinder's height as seen below.

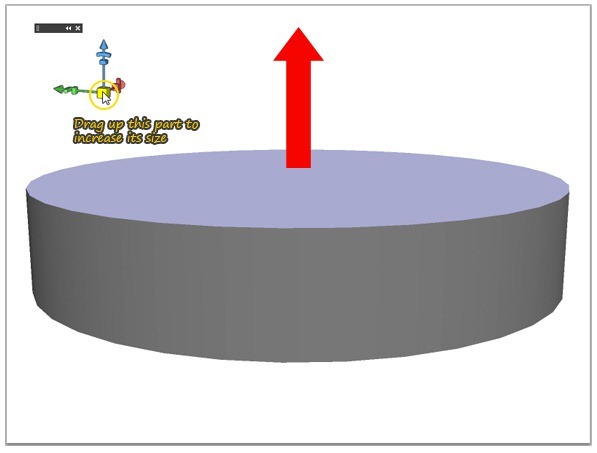
Step 3Increase the
cylinder size by dragging up the middle square in the 3D Axis, see image
below.
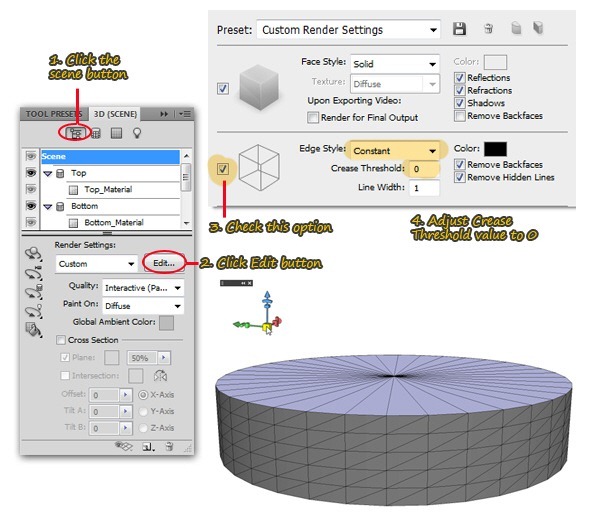
Step 4Still using the 3D
Object Rotation tool, adjust the perspective like shown below. Show the
3D panel by going to Window > 3D menu. Inside the 3d panel, click
scene button to see option about material and render settings. Click the
Edit button to show the 3D Render Settings dialog, we need to see some
wire frames for guidelines, so check the second option (wire frame box
icon), then adjust Crease Threshold value to 0. Click OK to apply
changes.
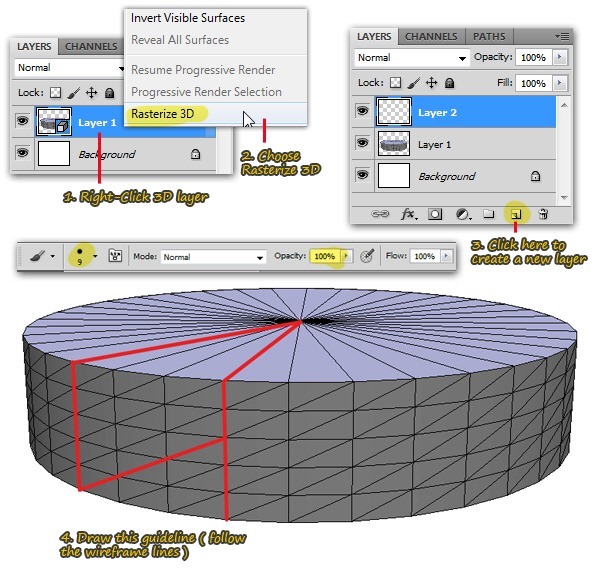
Step 5Convert 3d object
layer into a raster layer, then create a new layer above it. Using solid
round brush, draw a guideline to mark the area we're going to cut.
Step 6Create a light blue
(RGB: #6dcff6) ellipse using ellipse tool, make sure you create it below
the guideline layer. Using Edit > Free Transform Path command to
adjust ellipse's width and height. Don't forget to hit Enter when you're
done transforming.
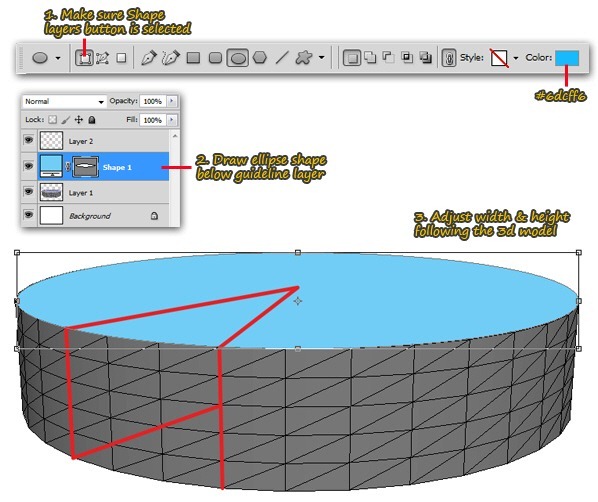
Step 7Create a new ellipse
shape below the first one, notice that I rename the layers for easier
recognition. Use free transform command to adjust ellipse's width &
height, following the 3d model as guidance. This process will be easier
if we can look the 3d model, so reducing the layer's opacity surely will
help us. As for the bottom edge part, use warp command to bend it. Hit
Enter when you're done.

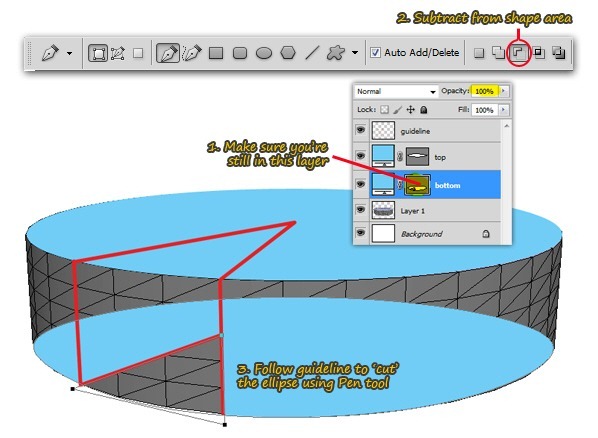
Step 8Still in the layer
bottom, select Pen tool from tool bar. Activate subtract from shape area
option, then follow the guidelines to create a triangle-like shape.
Because we're using subtract from selection mode, the triangle will
'cut' the ellipse as seen below.
Step 9Click layer top
thumbnail, then repeat the same step as before to cut the ellipse using
Pen tool.

Step 10We don't need the
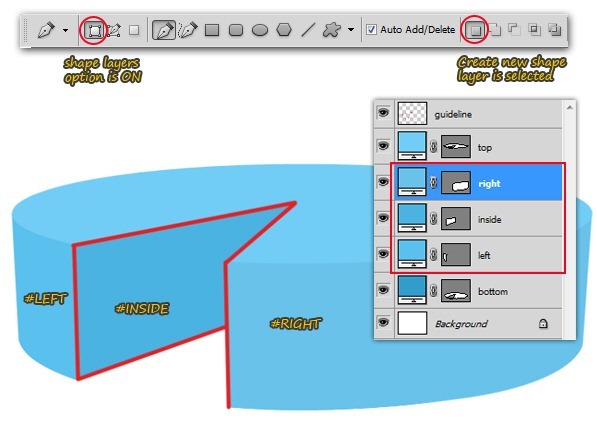
3d model layer anymore, so you can hide or delete it now. Still using
Pen tool, create the left, inside & right shape (I assume you
already know how to use Pen tool). For easier recognition, I suggest
using different blue color tone for each shape. Make sure the layers
order from top to bottom are like this: layer top, right, inside, left,
bottom (see image below for more details).
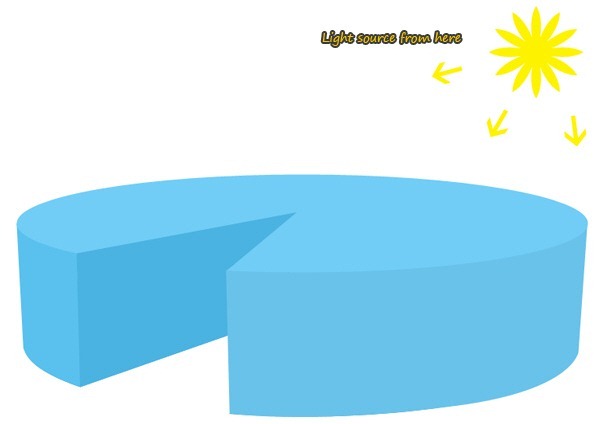
Step 11Now you've done
creating the 3D pie, hide or delete the guideline layer since we no
longer need it. The next step is adding texture, but first you have to
decide where to put the light source. You don't have to draw a polygonal
shape to do this step, just visualize in your mind that the light
source is from the top right corner (as seen below). Knowing the light
source will make your work easier, because you know where to draw
shadows and highlights globally.
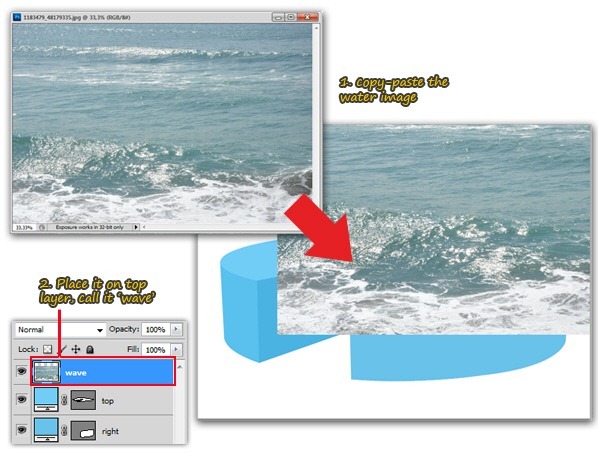
Step 12Open the
water image (File > Open).
Press Ctrl+A to select all parts of the image, then press Ctrl+C to
copy it to clipboard. Get back to 3D pie image and press Ctrl+V to paste
the water image. Make sure you place it above the TOP layer and name it
wave.
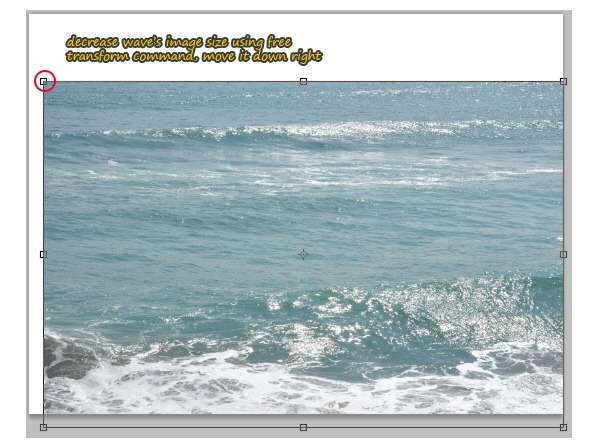
 Step 13
Still on the wave's layer, reduce its size by
pressing Ctrl+T (hold the Shift key while dragging the corner control
point, this will keep the aspect ratio of the image so it didn't look
squeezed or stretched). Hit Enter when you're done transforming. And
since we're agreed the light source is come from the upper right corner,
we need to flip the wave by using Edit > Transform > Flip
Horizontal menu. That's look better!
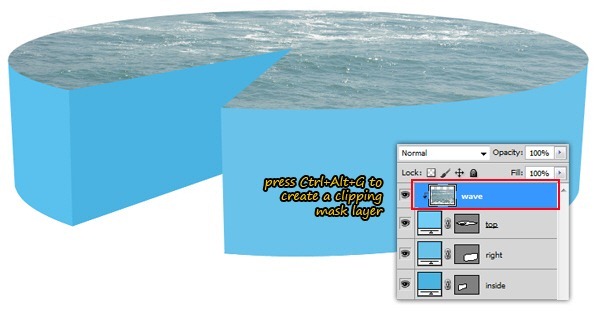
Step 14We need the wave
image as a texture for the top shape layer. In order to do that, simply
press Ctrl+Alt+G and voila, you've got the clipping mask layer.
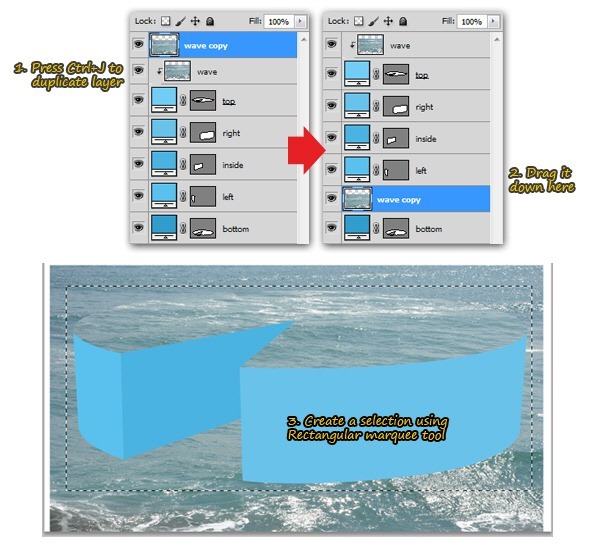
Step 15Duplicate the wave
layer, then drag it down between left and bottom layer. Create a
rectangle-like selection using the Rectangular Marquee tool.
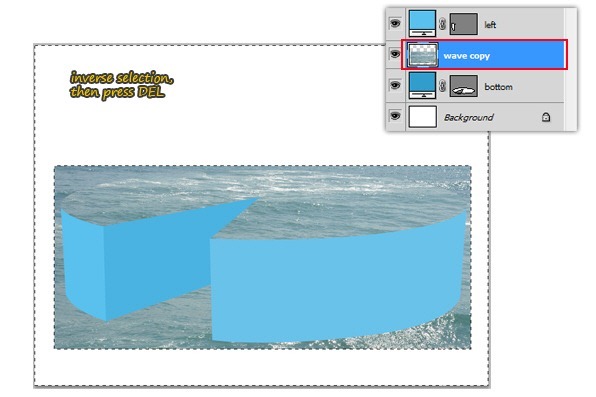
Step 16Invert the
selection by pressing Ctrl+Shift+I then press Delete, this step will
erase the selected areas. Now deselect by pressing Ctrl+D. To make sure
there is no part of the wave image outside canvas, press Ctrl+A to
select all part of the canvas, then go to Image > Crop.
Step 17Still in the same
layer, go to Edit > Transform > Warp then warp the image following
the 3D model side curve. See image below for more details.

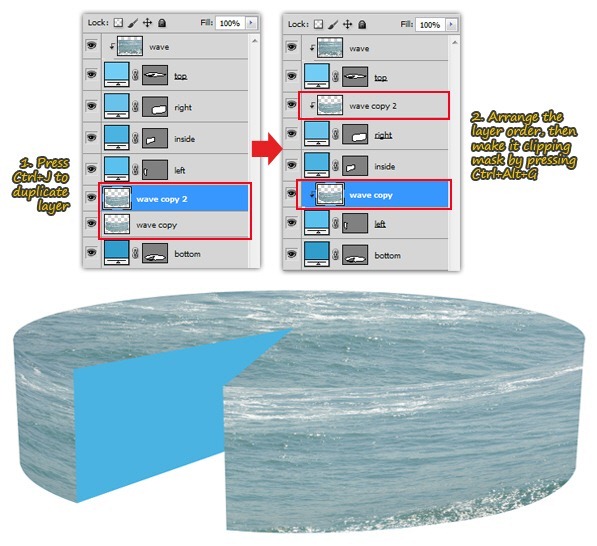
Step 18Duplicate the wave
copy layer, then place each image on top of left and right layer. After
that, make each one of them ( wave copy layer ) as a layer clipping
mask. Result of this steps can be seen in the image below.
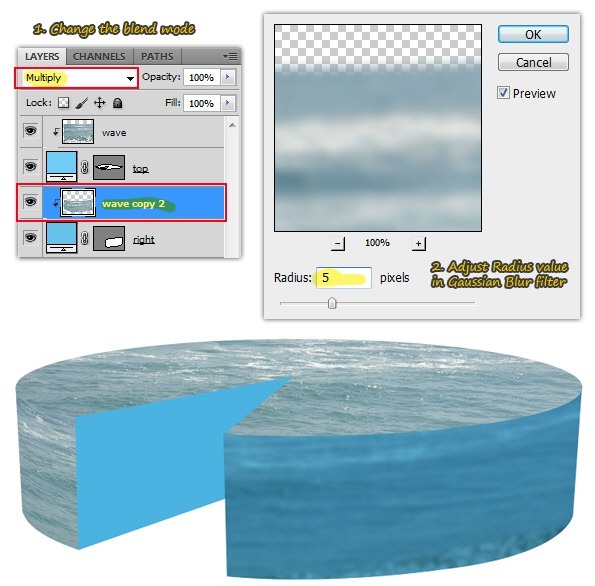
Step 19Select the wave
copy 2 layer (the one on top of right shape layer) then change the blend
mode to Multiply. Make it blur by going to Filter > Blur >
Gaussian Blur menu, adjust Radius value to 5px then click OK.
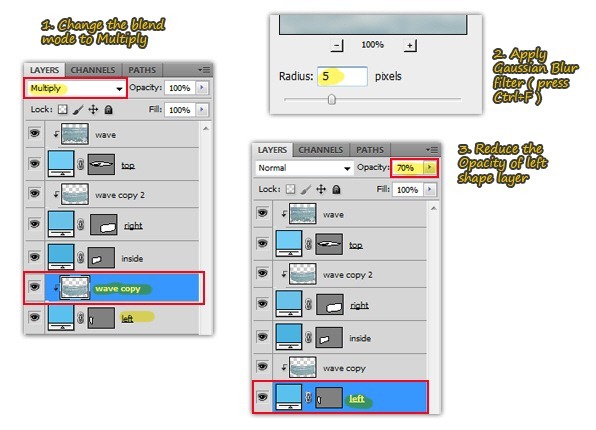
Step 20Repeat previous
step for the other wave image placed on top of left shape layer. To
apply the same Gaussian Blur filter, simply press Ctrl+F. When you're
done, select the left shape layer's and reduce the opacity to 70%. This
will make the left shape become transparent.
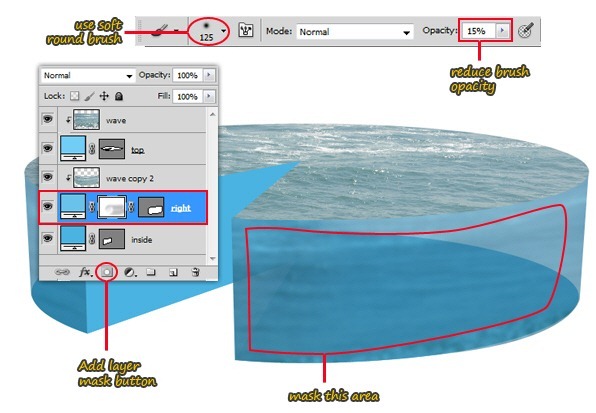
Step 21Go back to right
shape layer's, we need to tweak this layer so it look transparent as the
left shape. Reducing the layer opacity will simply work, but I didn't
want the entire right shape became transparent. So I decide to add a
layer mask, then use a black-soft round-Brush tool with low opacity
(around 10-20%) to mask some areas so the transparency is applied only
on certain parts (i assume you already knew how to do masking with brush
tool).
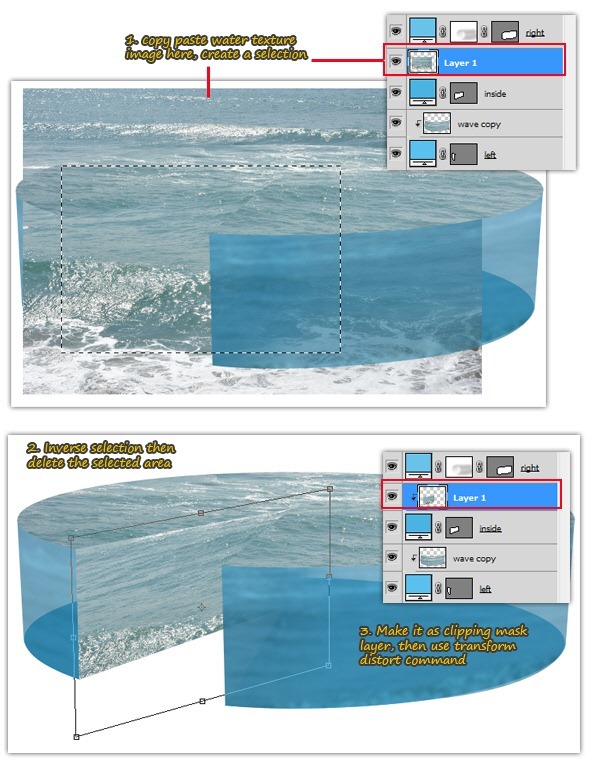
Step 22Copy-paste the
water texture image once
again, don't forget to decrease its size. Make sure you place this new
water texture layer on top of inside's shape layer, then create a
selection using Rectangular marquee tool. Now Inverse (press
Shift+Ctrl+I) the selection, delete the selected area then deselect (
press Ctrl+D ).Still in the same layer, make it as clipping mask
(press Ctrl+Alt+G) and then go to Edit > Transform > Distort.
Distort the water texture until it the perspective's feel right. Press
Enter when you're done.
Step 23Same as previous
step, change layer blend mode to Multiply then apply Gaussian Blur
filter. Later on, reduce the "inside" shape layer opacity to 70%.

Step 24Open and copy-paste
the sand
texture image into our working document. Place it on top of 'bottom' shape layer then
decrease its size using the free transform command.
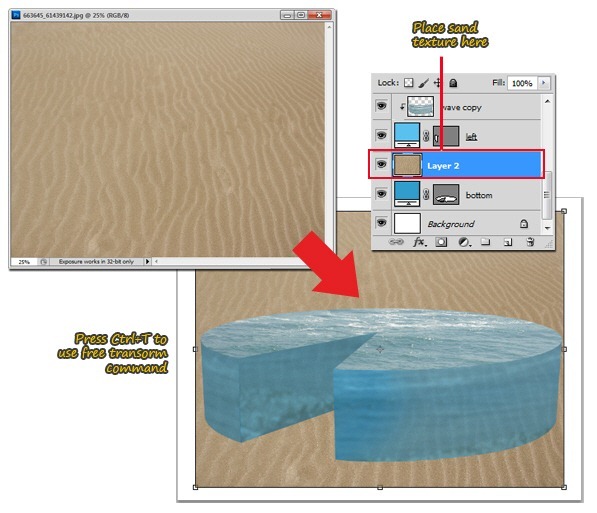
Step 25Transform the sand
texture using Edit > Transform > Distort command, making the
perspective view like shown below. Don't forget to press Enter when
you're done transforming.
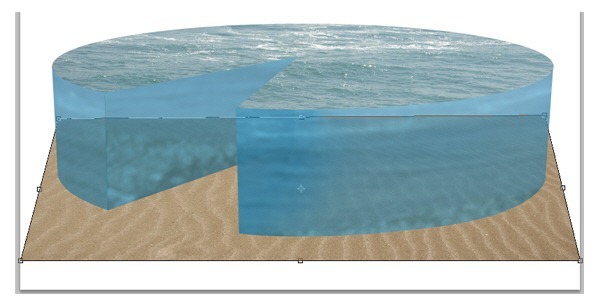
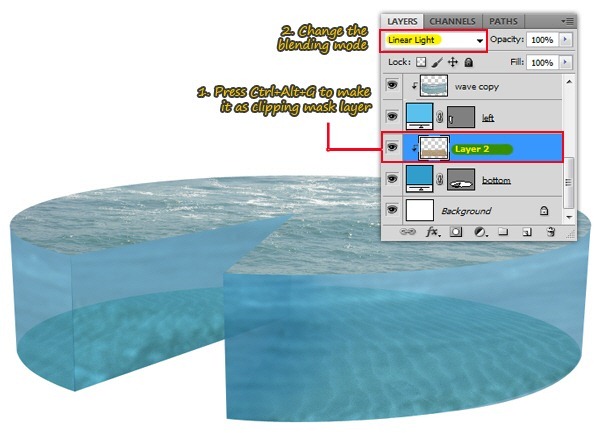
Step 26Next, make this
layer as a clipping mask layer by pressing Alt+Ctrl+G then change the
blend mode to Linear Light. This step also finish the 'adding
texture-part' of this tutorial.
 Step 27
Create a new clipping mask layer between sand texture
and 'bottom' layer, change the blend mode to Overlay then draw shadows
using soft round Brush with low opacity. When using Brush tool, remember
the light source we mention at the beginning as your reference where to
put shadows.
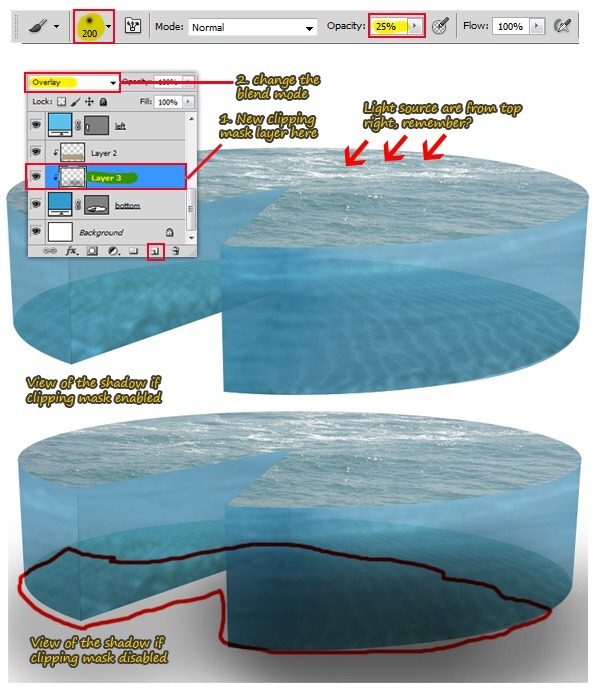
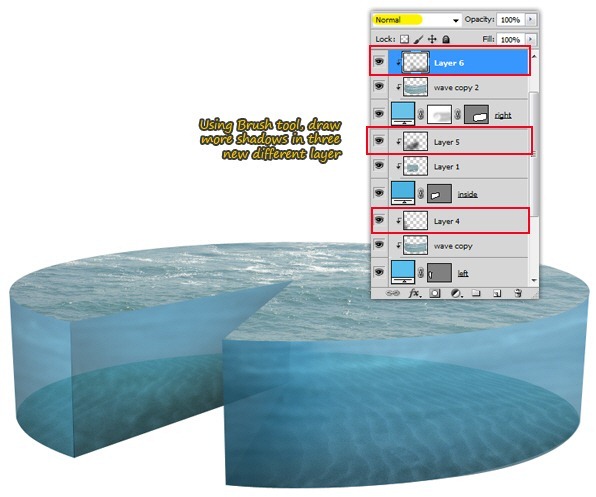
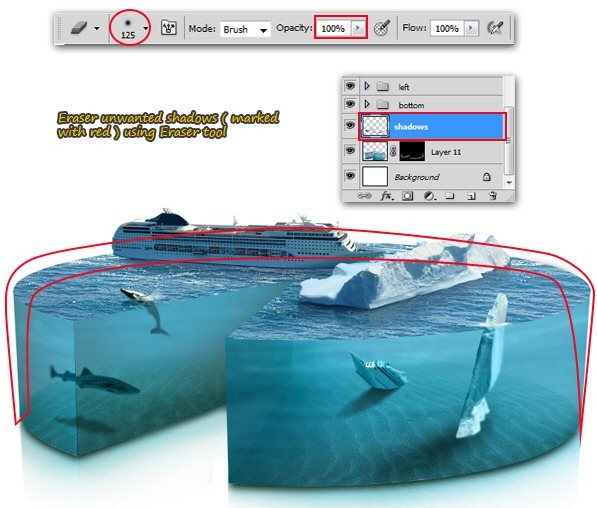
Step 28Repeat creating
shadows for each shape layers. But don't change the blending mode, leave
it normal instead. See image below if you need guidance.
Step 29Get back to sand
texture layer, we need to sharpen it a bit by using Filter > Sharpen
> Unsharp Mask menu. Inside the Unsharp Mask dialog, adjust Amount
and Radius value as seen below. Click OK to apply the filter.

Step 30I think we need to
sharpen the top most wave layer to make it more convincing as real sea
wave. Select the wave layer and repeat the Unsharp Mask filter, by
simply pressing Ctrl+F. We need to tweak the wave color balance since I
think more darker blue is better. To do that, we're using Hue/Saturation
( press Ctrl+U ) and Levels ( press Ctrl+L ) command.

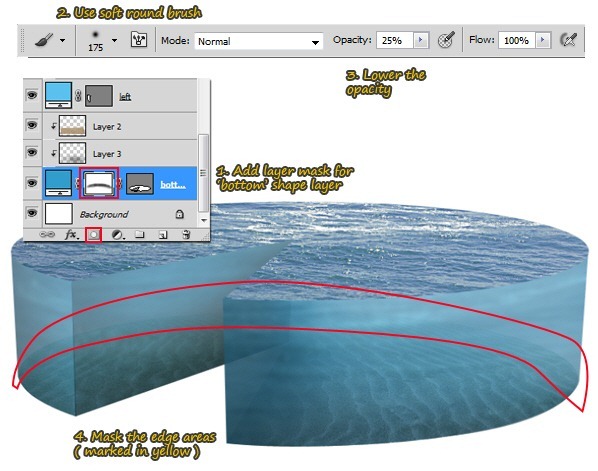
Step 31Select layer shape
'bottom', add a layer mask in this layer. Then using soft round Brush
tool with low opacity, mask the shape's edge ( the upper-right parts ).
As you can see, the result does imitate 'depth of field' when you look
something underwater.
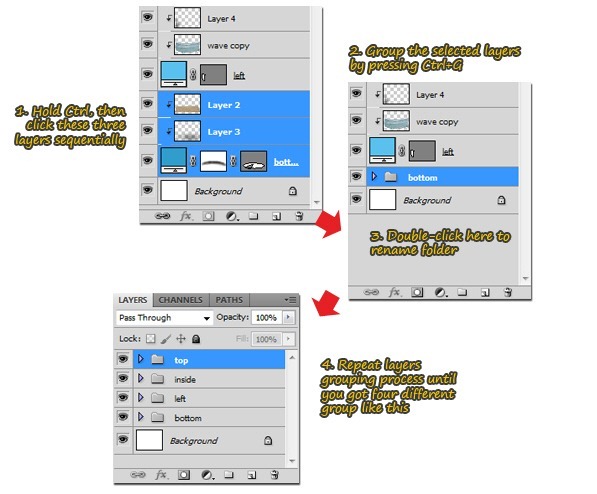
Step 32To keep organize,
put related layers inside a group/folder. This will bring out four
different group which is named 'top', 'inside', 'left' and 'bottom'. If
you using Photoshop CS3 or the later version, you can do this step
easily by Ctrl+Clicking related layers then press Ctrl+G.
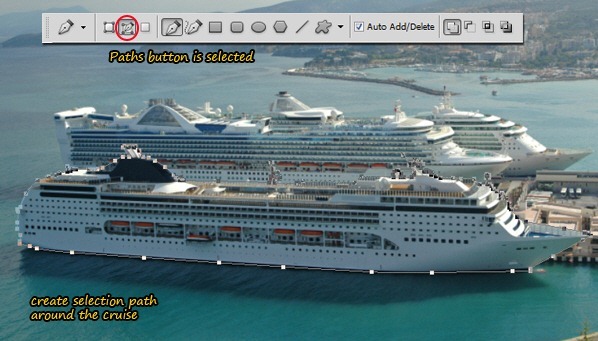
Step 33Open the
cruise image. Grab Pen tool
from tool bar, then start creating selection path to isolate the cruise.
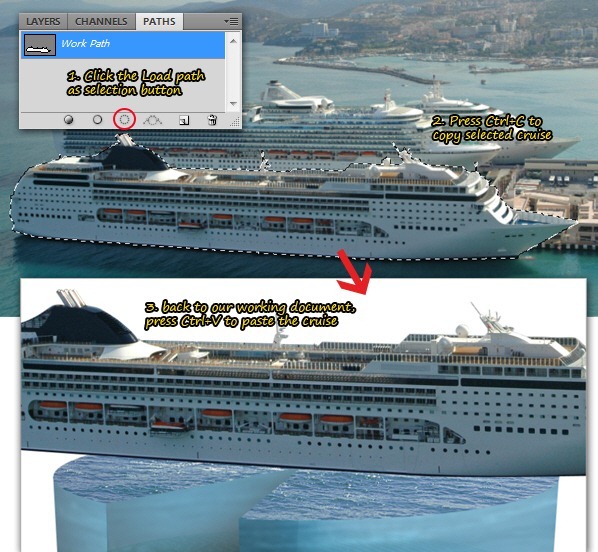
Step 34Go to Window >
Paths or simply click the Paths tab to show the Paths panel. Now click
the Load Path as Selection button to convert those paths into a
selection marquee. Copy-paste the selected cruise into our working
document.
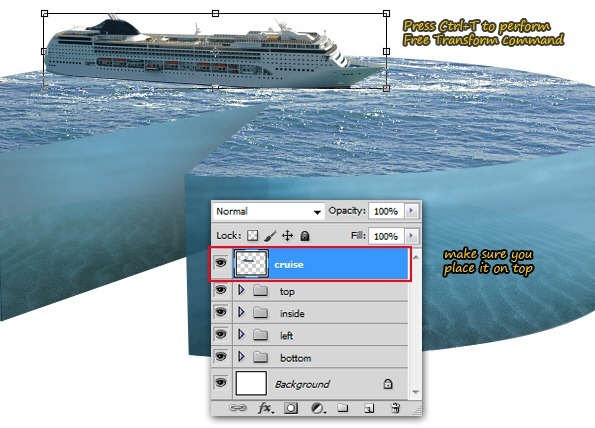
Step 35Using free
transform command, reduce the cruise's size. Make sure you place this
cruise layer on top of layer group 'top'.
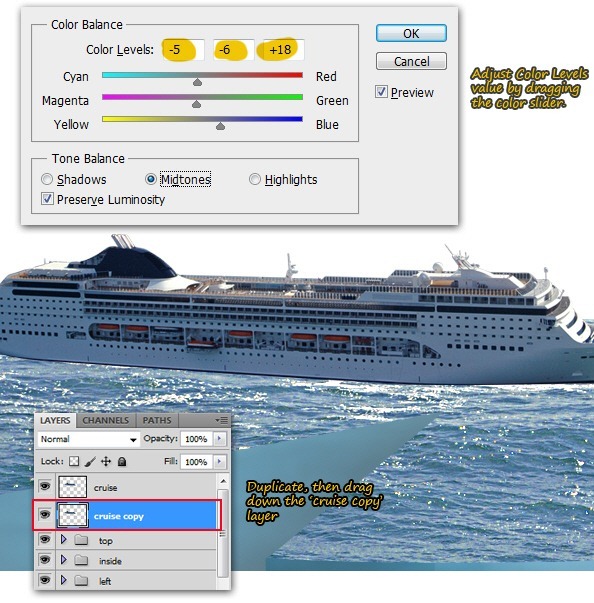
Step 36Go to Image >
Adjustment > Color Balance or simply hit Ctrl+B to bring the Color
Balance dialog. Adjust Color Levels value until the cruise color become
more bluish, this will imitate the ambient color from the water texture,
making the cruise color blend with the environment. Click OK to apply
color balance command.Water reflect things, right? so we'll need
to create one for the ship, adding realism. First, you need to duplicate
the cruise layer (Ctrl+J). Then drag down the cruise copy layer below
the original one.
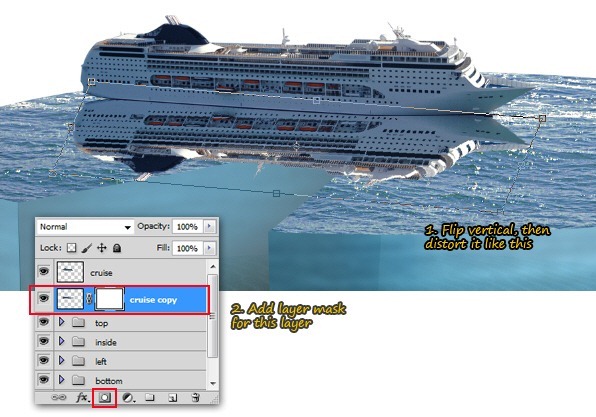
Step 37Go to Edit >
Transform > Flip Vertical to flip the 'cruise copy' image. Do some
distortion here by using the Edit > Transform > Distort menu, hit
Enter when your done. Now add a layer mask in this layer because we'll
going to hide half of the 'cruise copy' image using layer mask.
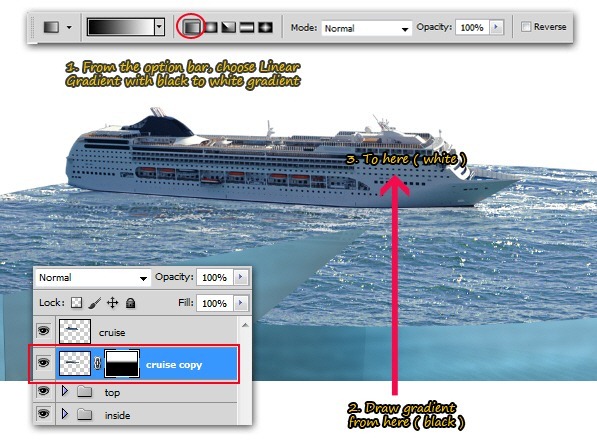
Step 38Grab the Gradient
tool, and draw linear gradient vertically from white to black (make sure
the layer mask is active when you did this). There you go, looks like a
reflection isn't? but we're not finished yet, some shadows is needed
for adding realism and depth.
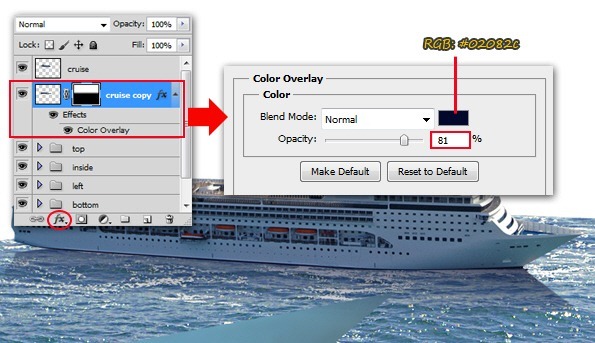
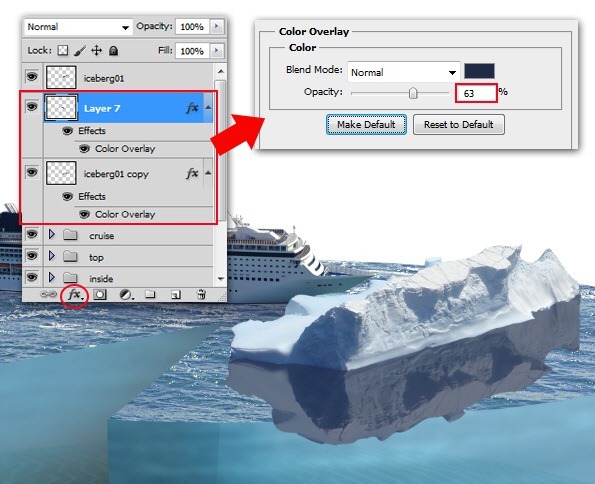
 Step 39
Still in the same layer, add Color Overlay layer
style. Choose a dark blue color, and reduce the opacity to get the
semi-transparent color effect.
Step 40We need some minor
tweak for the ship's reflection. Click back the layer mask of 'cruise
copy' layer. Use soft round Brush tool to mask shadow's front and back
edge (marked with red circle in the image below). That's better!
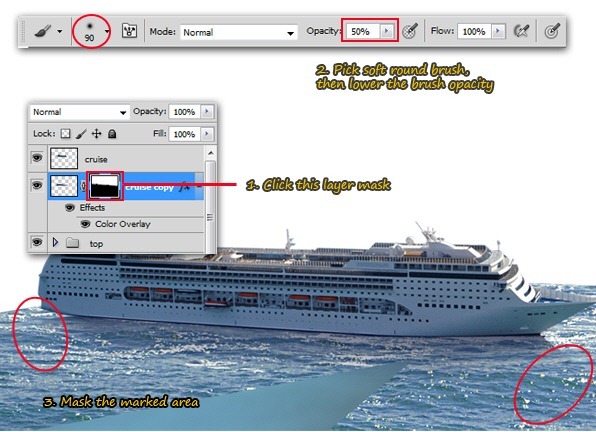
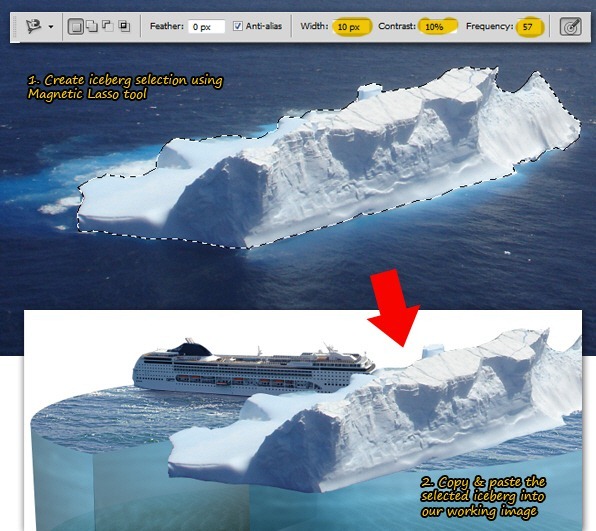
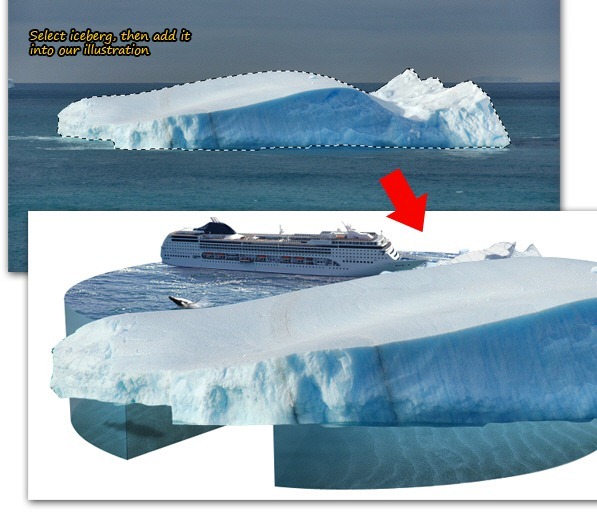
Step 41Open the
first iceberg stock image.
Since the color between iceberg and ocean are contrast enough, you can
easily create a selection using Magnetic Lasso tool. Copy-paste the
selected iceberg into our working document.
Step 42Decrease iceberg
size using free transform command. Make sure you put iceberg layer on
top of cruise layer group (I've been grouping those layer before doing
this step), name it 'iceberg01' since we're gonna add second iceberg
later.

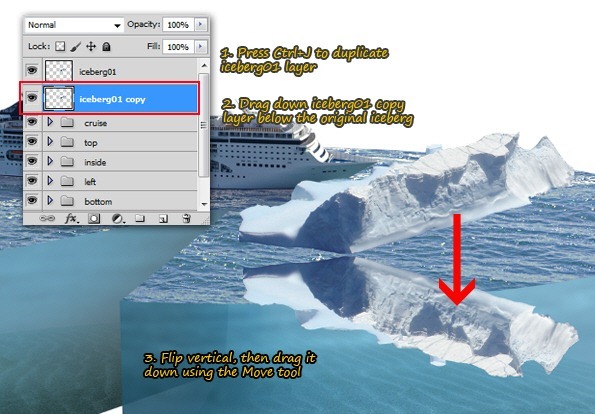
Step 43This iceberg need
reflection, so first thing is to duplicate iceberg01 layer then drag
down the iceberg01 copy layer below it. Then go to Edit > Transform
> Flip Vertical to flip the 'iceberg01 copy' vertically. Use Move
tool to drag down iceberg01 copy image, you'll see it's rather difficult
to create reflection if the image has this kind of perspective.
Step 44Lets begin with the
left part of iceberg reflection, create a simple selection using Lasso
tool. Press Ctrl+J to copy selected areas into a new layer, then use
free transform command to rotate it clockwise. Try matching the upper
edge part with the original iceberg above it, press Enter when done.

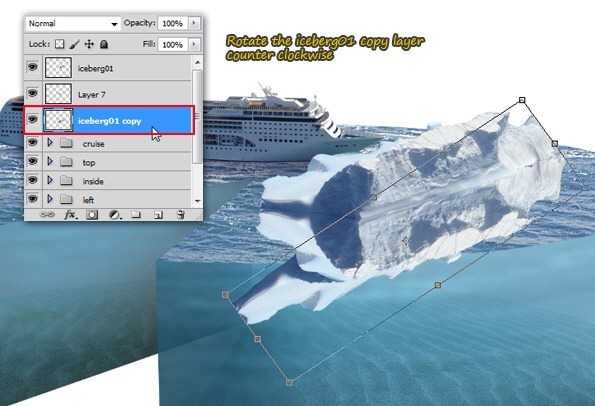
Step 45Go back to
'iceberg01 copy' layer and rotate it counter clockwise, it will not
perfect but try to align the upper edge with the original iceberg above
it. And yes, you probably want to stretch it a bit like I did ( shown in
the image below )
Step 46Erase the excessive
iceberg reflection using Eraser tool, see image below for guidance when
erasing.

Step 47To make the
reflection color becomes darker, add Color Overlay layer style for each
iceberg copy. Pick a dark blue color with low opacity.
Step 48A reflection
usually faded, right? so, add layer mask for each 'iceberg copy' layer
and then mask it using linear Gradient tool until you get this result (
see image below ).

Step 49Notice the
excessive part from the 'iceberg copy' layer, we didn't want that
annoying part. Click the thumbnail of layer 'iceberg copy', and then
erase the annoying part using Eraser tool. See image below for guidance
when erasing.

Step 50Create a new layer
between iceberg01 layer and its reflection layer. Then load a selection
by Ctrl+Clicking the thumbnail of iceberg01 layer. Press Shift+F5 to
bring the Fill dialog box, select black and reduce Opacity to40%. Click
OK to fill the selection with low opacity black.

Step 51Press Ctrl+D to
deselect. Then go to Filter > Blur > Gaussian blur menu, adjust
Radius value: 5px. Click OK to apply Gaussian Blur filter, now you got
shadows surrounding the iceberg. We didn't need shadows on the upper
part of the iceberg, so just delete it using Eraser tool.

Step 52Create another new
layer on top the previous layer, change the blend mode to Soft Light.
Ctrl+Click on the iceberg01 layer thumbnail to load selection, then Fill
it with 100% black. Using move tool, drag the new iceberg shadow to
left like shown in the image below.
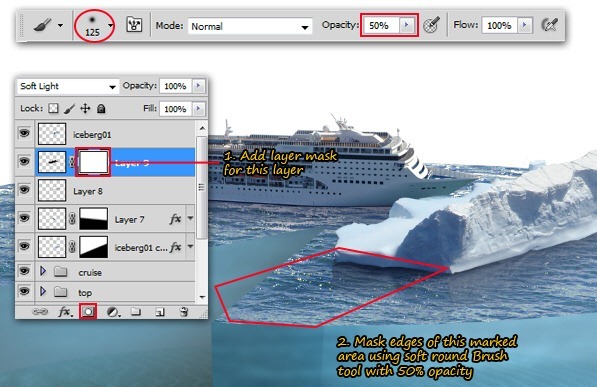
 Step 53
Still in the same layer, add a layer mask into it.
Mask certain parts using Brush tool to hide unwanted shadow areas. See
image below for guidance.
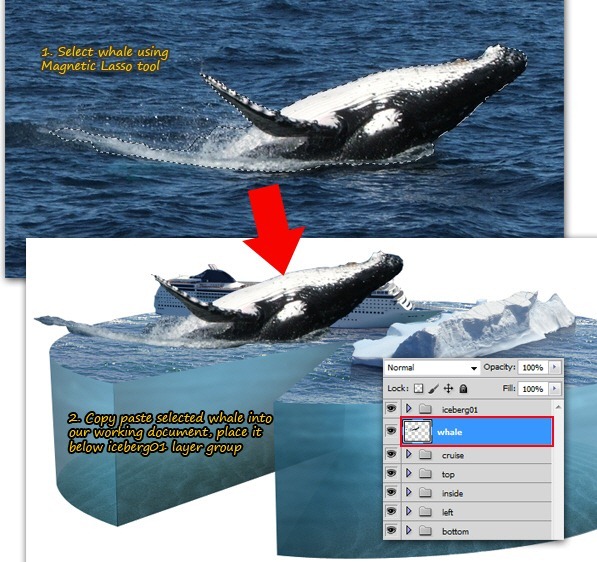
Step 54Open
whale image, create selection
of the whale using any selection tool you like ( I'm using Magnetic
Lasso tool ). As usual, copy-paste the selected whale into our working
document. Place it between layer group 'cruise' and 'iceberg01', lets
call this layer 'whale'.
Step 55Adjust whale size
using free transform command, and then go to Edit > Transform >
Flip Horizontal to flip it.Create a new layer, name it 'splash' because
we're gonna draw some water splash in this layer. Grab Brush tool from
the toolbar, pick a spatter brush and lower the opacity to 50%. Choose
white as brush color then click several times ( don't click and drag,
the result will be different ) in certain areas where water splash
should appear, use your imagination.

Step 56Open the
second whale image. Select the
whale silhouette (I'm using magic wand tool to select it), then
copy-paste selected image into our working document.

Step 57Place whale
silhouette layer below whale layer, rename its layer to 'shadows'. Flip
whale silhouette horizontally then resize until it fits the whale body.
Erase unwanted shadows parts using hard round Eraser tool, see below
image for guidance.

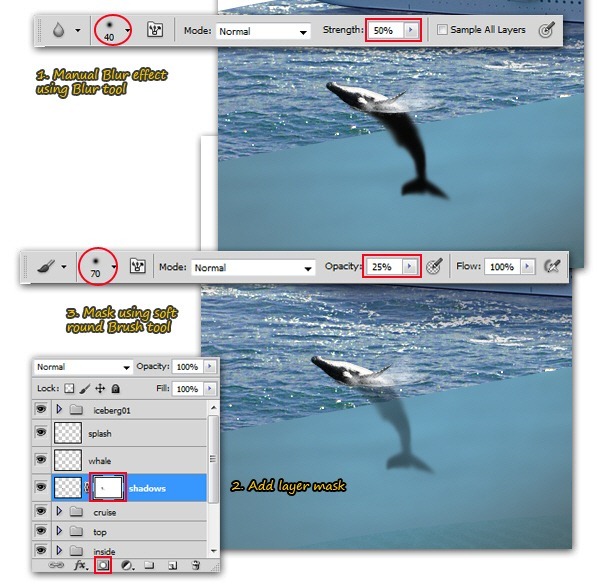
Step 58Now we need to fake
the 'deep underwater' blurry effect, using Blur tool with 50% strength
(see below image for guidance). Add layer mask, then using the soft
round Brush tool with 25% opacity, mask whale's shadow to create the
semi-transparent look.
Step 59Add a new layer
between whale and shadow layer, we're gonna add more shadows in this
layer. Ctrl+Click on the layer whale thumbnail to load a selection, then
go to Edit > Fill menu. Inside the Fill dialog, choose 100% Black
and then click OK to fill the selection. You won't see the result since
it covered by the whale layer.

Step 60Rotate whale's
shadow to left, erase unwanted parts using hard round Eraser tool with
100% Opacity.
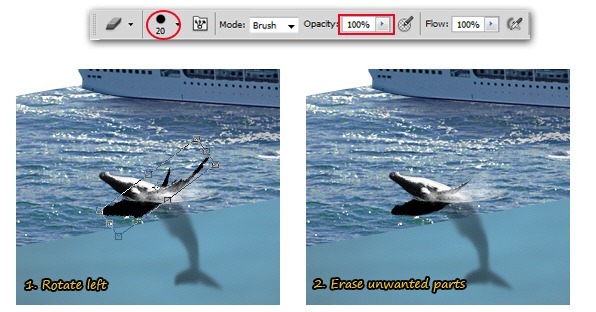
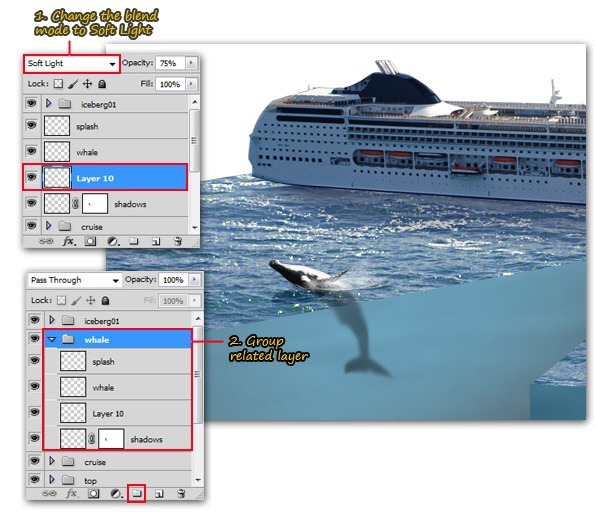
Step 61Change the blend
mode to Soft Light and reduce the Opacity to 75%. As usual, keep
organize by grouping the whale-related layers into one folder.
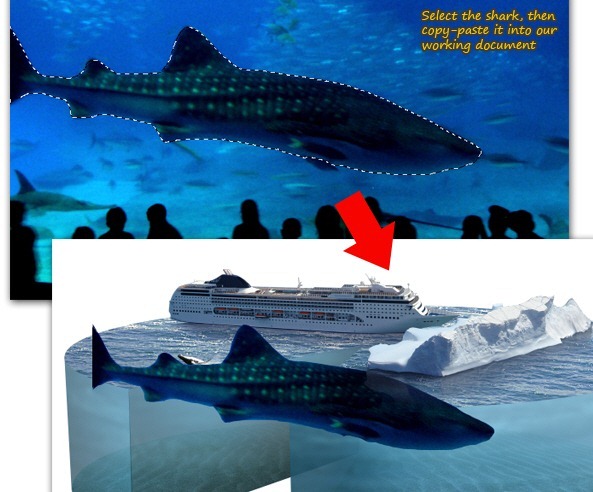
Step 62Open
shark image, create selection
for the shark ( I'm using Pen tool to do it ). As usual, copy-paste the
selected shark into our working document.
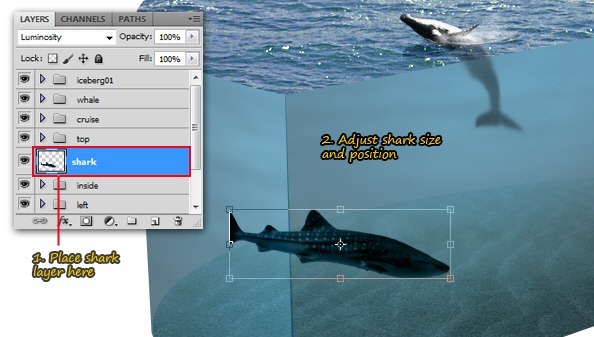
Step 63Place shark layer
between 'inside' and 'left' group. Change the blend mode to Luminosity
and adjust shark size and position like shown in the below image.
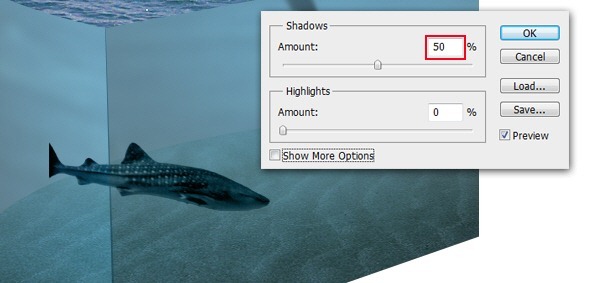
Step 64Go to Image >
Adjustment > Shadows/Hightlights menu, adjust shadows amount to 50%
then click OK to apply. Shark image will be much brighter then before.
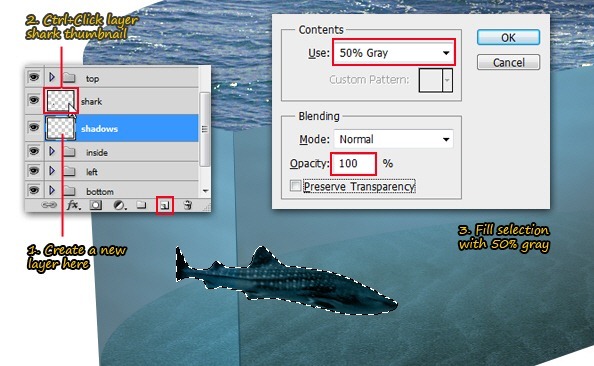
Step 65Create a new layer
below shark layer, we call it 'shadows' because shark's shadow will be
drawn here. Load shark selection by Ctrl+Clicking the shark layer
thumbnail. Press Shift+F5 to bring up the Fill dialog and choose50% gray
to fill the selection.
 Step 66
Change blend mode to Multiply and reduce Opacity to
75%. Use Filter > Blur > Gaussian Blur with radius: 5pxto blur the
shadows. After that, use Edit > Transform > Distort command to
adjust shadow size and distortion.

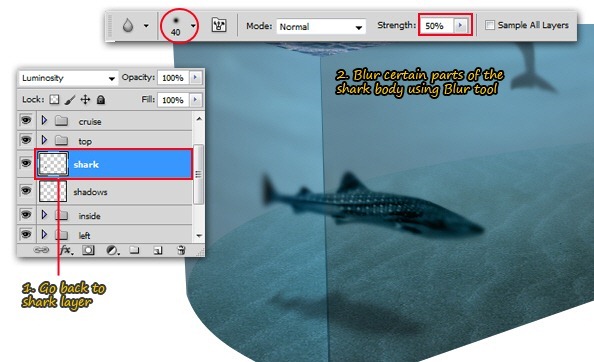
Step 67Go back to shark
layer, blur certain parts of the shark using Blur tool with 50%
strength, faking the depth of field effect.
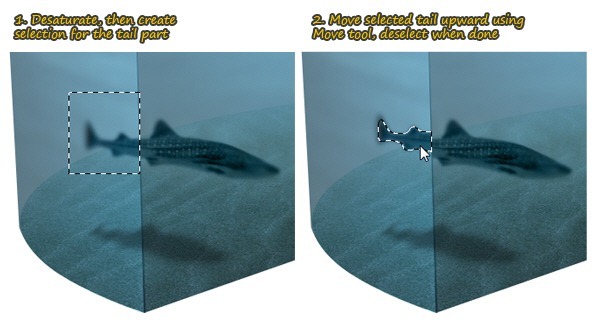
Step 68Still in the same
layer, press Ctrl+Shift+U to desaturate shark's color. We also need to
fake the lens distortion effect, first thing to do is create a selection
in the tail area using Rectangular Marquee tool. Second, activate the
Move tool and then nudge the selected area by pressing the Up Arrow
several times. Deselect by pressing Ctrl+D.
Step 69Open the
second iceberg stock. As
usual, create a selection around the iceberg (Magnetic Lasso tool is
quite good enough). Copy-paste the selected iceberg into our working
document.
Step 70Place the second
iceberg layer below iceberg01 folder. Using free transform command,
adjust its size like shown in the below image. Press Enter when you're
done.

Step 71Press Ctrl+J to
duplicate the current layer. Get back to iceberg2 layer to change its
blend mode to Luminosity.
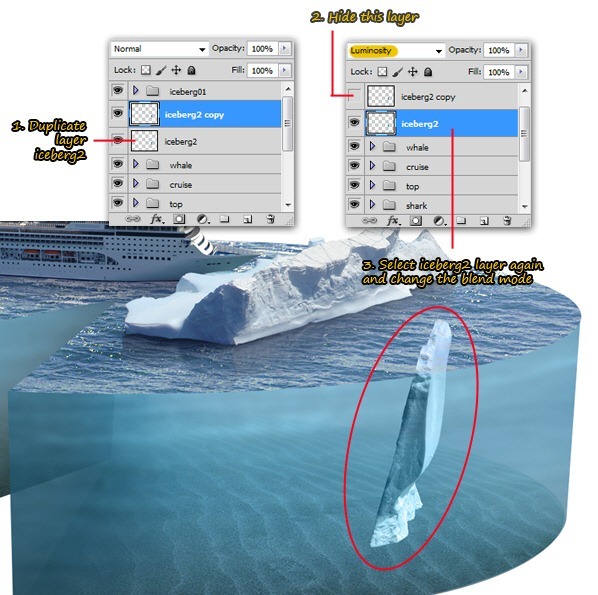
Step 72Hide layer
'iceberg2 copy', then add layer mask for iceberg2 layer. Hide the upper
part of iceberg2 using black soft round Brush tool with 100% opacity,
the result can be seen in the below image.
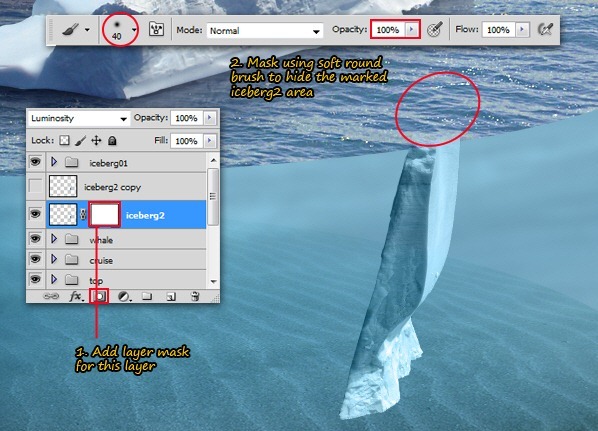
Step 73Show the 'iceberg2
copy' layer again then add a layer mask in that layer.This time, use
black soft round Brush tool to mask (hide) the lower part of iceberg2
image. As you can see now, the iceberg2 lower part seems submerged under
water.
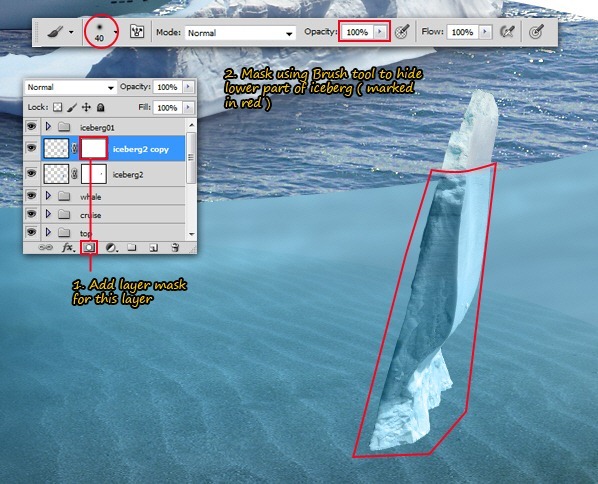
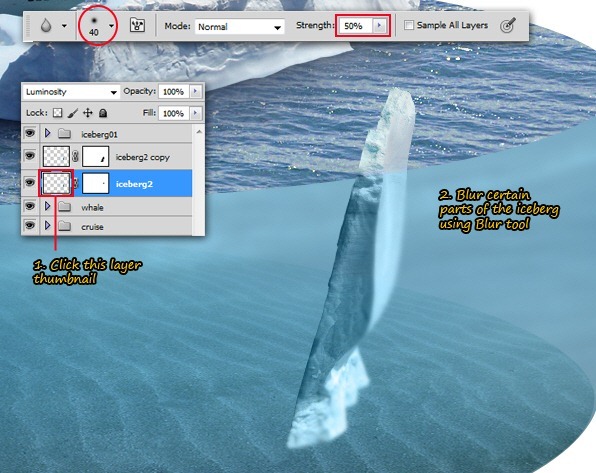
Step 74Click on the
iceberg2 layer thumbnail (this is to make sure you're the one we're
editing now is the layer's content, not the layer mask). Use soft round
Blur tool with 50% Strength to blur some parts of the iceberg2, see
image below for guidance.
Step 75Create a new layer,
name it 'splash' because we're gonna add water splash there. Use white
spatter brush with50% opacity to draw some water splash. Click several
times until you satisfied with the result (don't click and drag, because
the result will be different). If you unhappy with the water splash
result, delete unwanted parts or just transform it like I did.

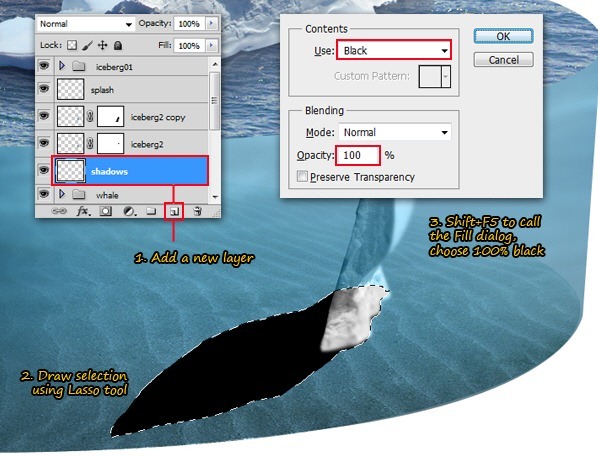
Step 76Create a new layer
below iceberg2 layer, we call this layer 'shadows'. Draw a selection
using Lasso tool (just a simple silhouette of the iceberg2, no need to
imitate the iceberg2 shape precisely). Fill the selection with 100%
Black.
Step 77Go to Filter >
Blur > Gaussian blur menu to blur the shadows around 25px radius.
Click OK to apply blur filter.

Step 78Add layer mask for
the current shadows layer. Mask the shadows using soft round Brush tool
with 15% opacity, see image below for guidance. This also ends the
'adding iceberg' part in this tutorial.

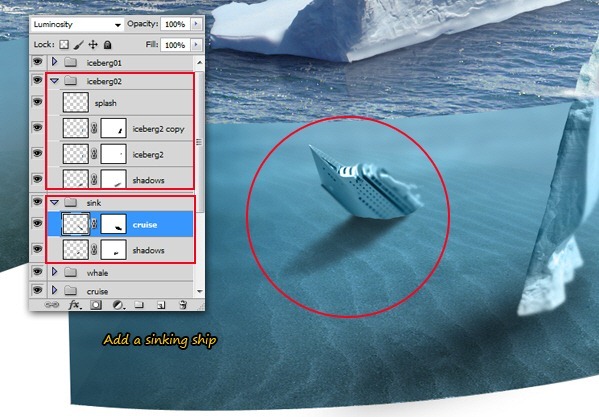
Step 79With the same
technique when you submerge half of iceberg2, add another submerge
object. For example, I'm sinking the cruise (you can use anything, be
creative!). Don't forget to group related layers, keep organized!
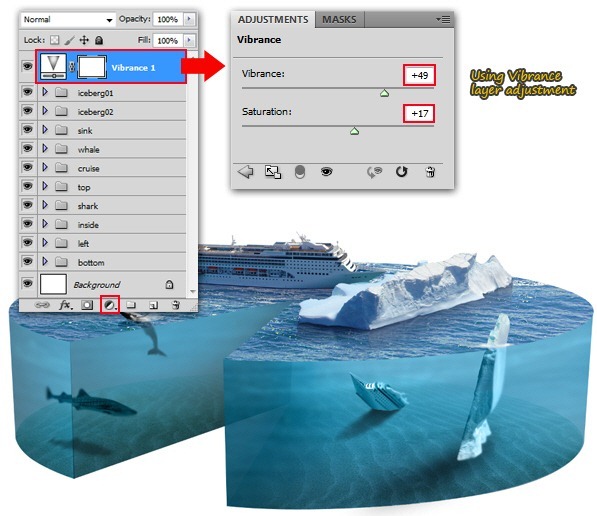
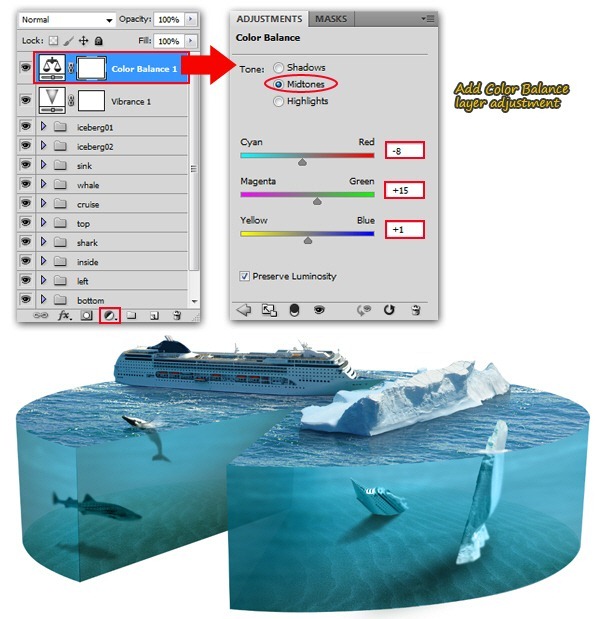
 Step 80
On the top most of layer groups, add Vibrance layer
adjustment (just go to Layer > New Adjustment Layer > Vibrance).
Click OK, then increase the value until we get more vibrance blue/teal
color for the entire image ( in my experiment, the value for vibrance is
+49 while saturation value is +17 ).
Step 81Add another layer
adjustment, which is Color Balance (found in Layer > New Layer
Adjustment > Color Balance). Adjust Color balance value until the
illustration become a bit greenish (in my experiment, the value for
midtones color balance is: -8, +15, +1)
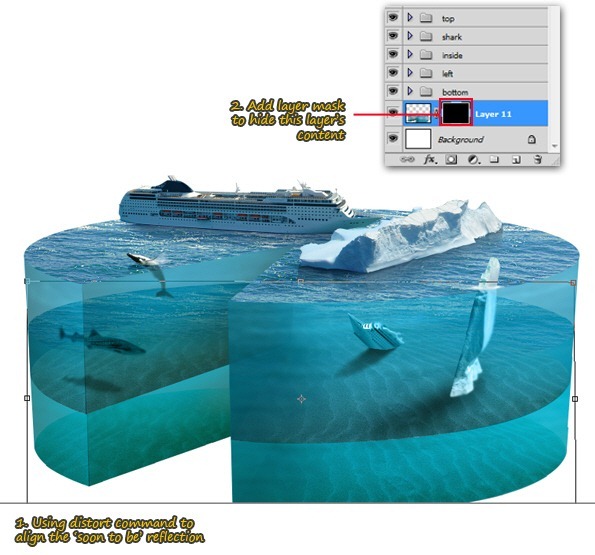
Step 82Hide background
layer and all other layer group except the top, inside, left, bottom and
two adjustment layer on top (see below image to be certain). Select the
top most layer (color balance layer) and then press Shift+Ctrl+Alt+E to
merge all visible image into a new layer.

Step 83Unhide layers we've
been hide in the previous step, then drag layer 11 ( the merged layer )
below layer group 'bottom'. Load a selection by Ctrl+Clicking this
layer thumbnail, and then save the selection via Select > Save
selection menu. You can give any name for the selection (in this
example, I name it alpha-1), click OK to save it.

Step 84Still in the same
layer, go to Edit > Transform > Distort and try to align the
merged layer so it look like a reflection. Use the Layer > Layer Mask
> Hide All, which is will add layer mask filled with black,
completely hiding layer 11 content's.
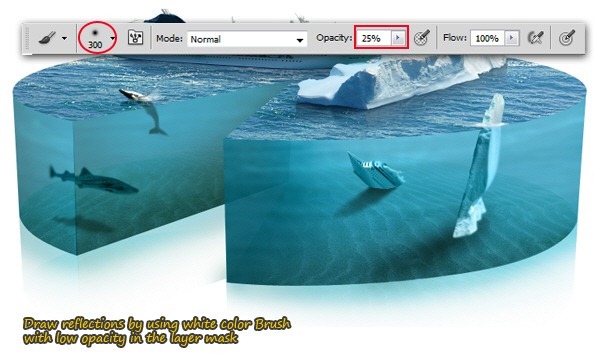
Step 85Now grab the soft
round Brush tool with low opacity ( 25% ), make sure you choose white
for brush color. Slowly using brush tool in the below part to create
reflections. See image below for guidance.
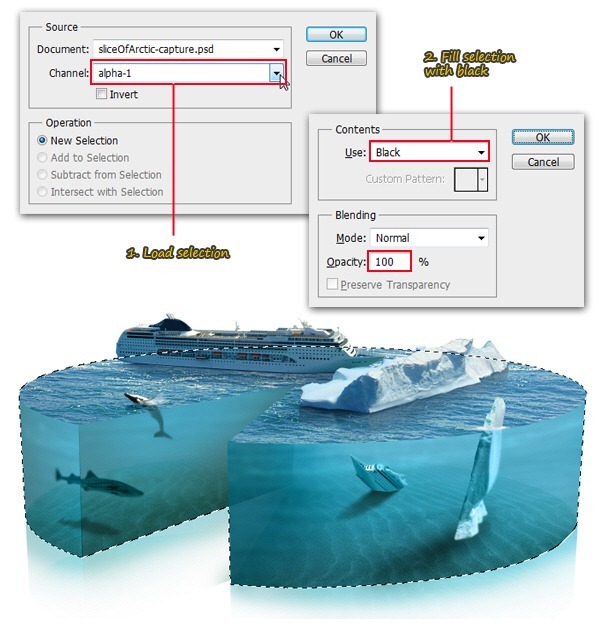
Step 86Make sure we're
still in the layer mask, then go to Select > Load Selection menu.
Inside the load selection dialog, choose alpha-1 channel and then click
OK to load the selection. Fill this selection with 100% black.Don't
deselect, yet!.
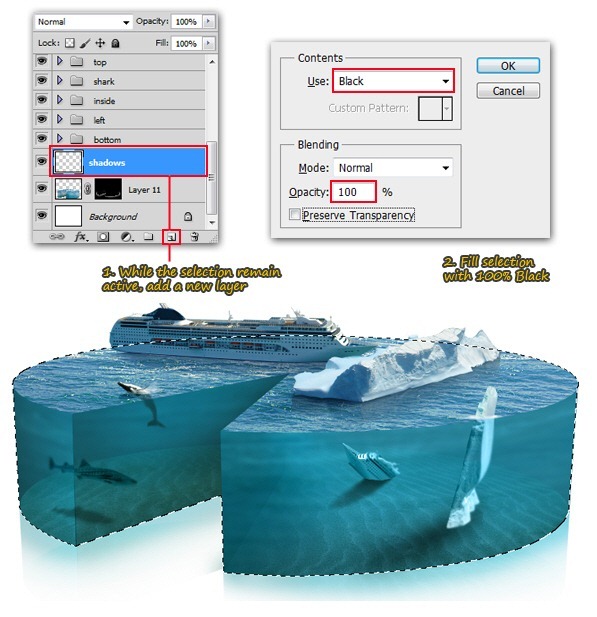
Step 87Add a new layer on
top of current layer, name it 'shadows' since here we gonna add shadows
for the ocean-pie piece. Fill the selection with 100% black, then
deselect it by pressing Ctrl+D.
Step 88We need to see a
bit of the shadows, so nudge it down using the Move tool as seen in the
below image. Use Gaussian Blur filter with 10px radius to blur the
shadows.

Step 89We just need
shadows for the downside part, so we'll need to erase unwanted shadows
using Eraser tool like shown in the below image. And that's it, we are
done!
Final Results
Download the PSDPiece
of Artic.zip | 14 MB
Thanks for following this tutorial! I hope you learn something new here,
and the techniques can be applied for alternate uses, which is to find
out by yourself. If you curious about me or like to see my other design
works, visit my
deviantart
page. See you on another tutorial!


